Concealer is one of those products that we're are not really sure if we reeeally need it or not. The right concealer can hide just about every imperfection and give you flawless skin. Liquid concealer is especially recommended for dry skin and for concealing large areas like under-eye circles. Solid concealer is necessary to hide stubborn pimples, scars and bruises.
1. Start with a clean moisturized face.
A clean, moisturized face will allow the concealer to go on your skin smoothly and it will blend easier. If done on dry skin, your concealer make your skin look cakey and more dry.
2. Choose the right color.
Just like foundation, choosing the correct concealer can be daunting. Your best bet is to go with shade that matches your skin perfectly, of course. If you are using concealer for highlighting/contouring purposes you would want to go a shade or two lighter for your highlight and a shade or two darker for your contour.
3. Pat, Don't Rub!
I like to use my fingers when applying concealer. To me it gets in tight spaces better (under the lower lash line, around the nose) and blends a lot easier. No matter if you're using your finger or a brush, its better to pat the product into your skin rather than rubbing it.
4. Blend!
Make sure to blend the edges of the concealed area with the surrounding skin by patting on the product in a circular motion to avoid harsh lines in the finished look.
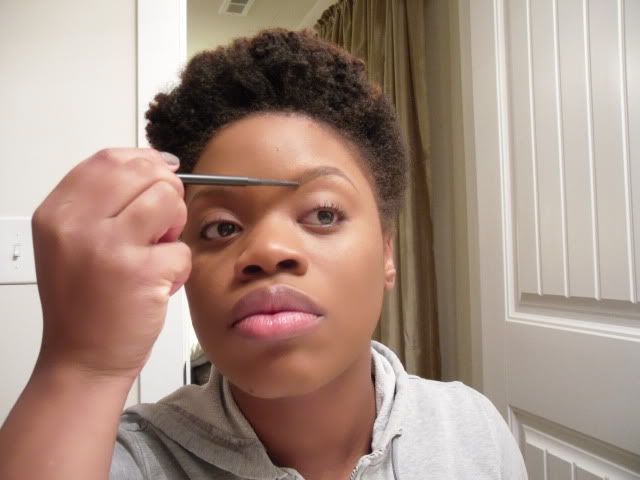
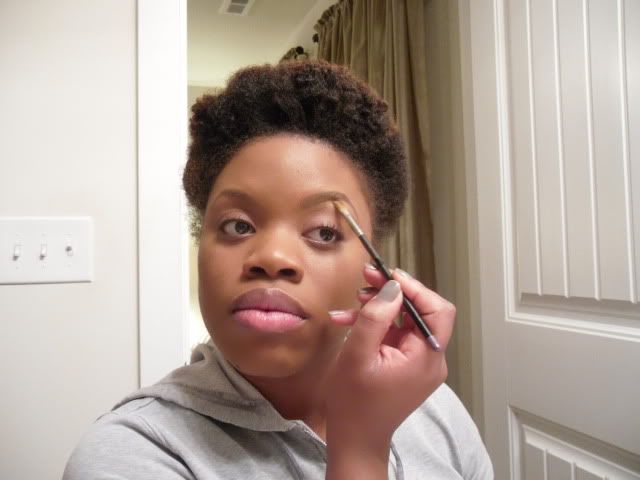
5. Use it to make brows, eye shadows and lipsticks POP!
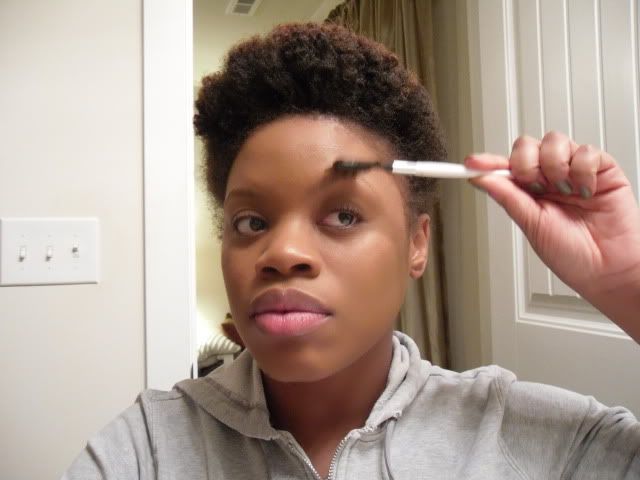
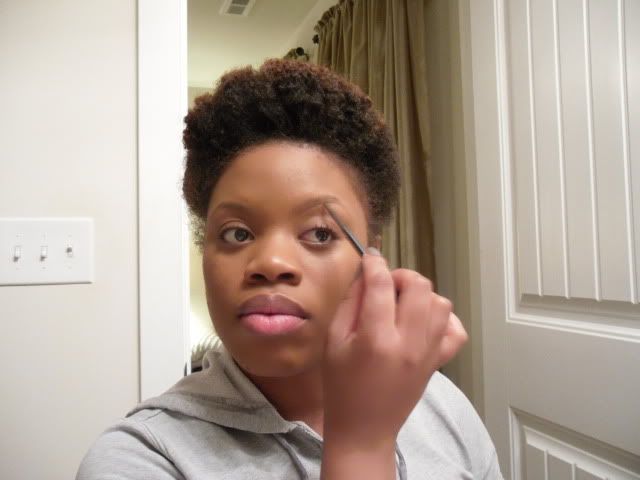
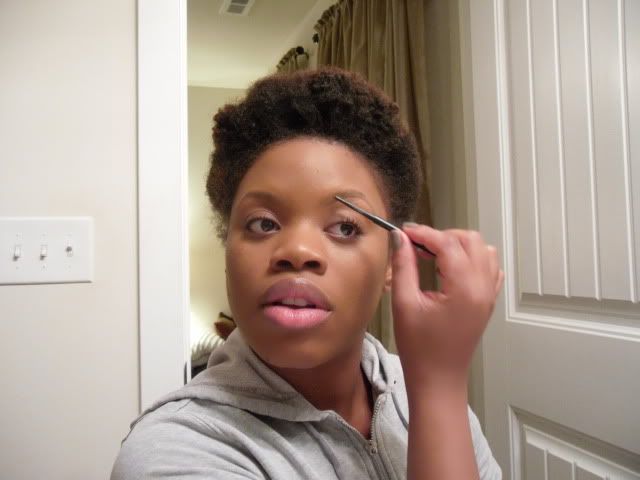
- Applying a concealer a shade lighter to your brow bone can do wonders for your brows and overall look. It gives your brow a "wow" factor while also covering any new growth you may have.
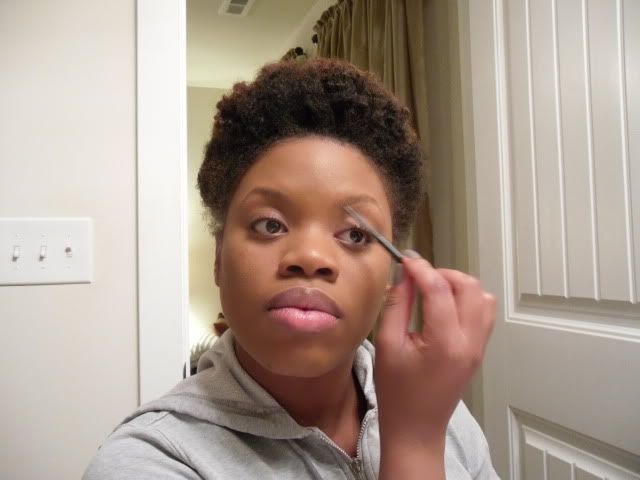
-Your concealer can also work as an eyeshadow primer when applied to your lids (be sure to use a shade that matches your skin ), helping the shadow to pop and stay on longer.
-Adding a little concealer to your lips just before applying color will help neutralize the lips so that the lipstick color will remain true. You can also add concealer to the perimeter of your mouth get a more defined lip (works great when wearing bright colors like red and pink).
Do you have any tips to help our beginners? What are some of your favorite concealer brands?
Showing posts with label Makeup 101. Show all posts
Tuesday, June 28, 2011
Thursday, April 07, 2011
Makeup for Absolute Beginners | Setting Powders and Finishing Sprays
SETTING POWDER
A setting powder is a loose or compact sheer-to-medium coverage powder that “sets” your foundation so that it lasts throughout the day. It adheres to any damp and/or sticky part of the foundation and creates somewhat of a seal. If you used a liquid foundation alone, you can usually feel a “damp” feeling on your face. You can combat this by using a loose setting powder. It can also help remove excess shine.
It’s really beneficial for us oily girls to use a setting powder so that the oils in our skin don’t break down our makeup to the point where it’s sliding and/or disappearing from our faces thus making touch-ups less frequent. It also can stop our makeup from getting all over our clothing or anything we touch throughout the day.
Finishing sprays are usually applied by a spritzer on the face for a little 'pick-me-up'. If you had a long day at work and don't have time to reapply for your after work festivities, a finishing spray works great. They are also perfect for the dewy look we all love. The spray is meant to resist the heat and humidity which causes smearing, melting and loss of makeup color. It is often used by make-up artists on models and actors for photo shoots and filming.
[I am not a reapply/touch-up girl, I don't even carry a makeup bag throughout the day. After applying my foundation in the morning I set it with MAC's Mineralized Skinfinish Natural, if I get oily I blot off excess oil withwhatever I can find tissue. I use a finishing spray if I have something to do after work and don't want to reapply makeup.]
A setting powder is a loose or compact sheer-to-medium coverage powder that “sets” your foundation so that it lasts throughout the day. It adheres to any damp and/or sticky part of the foundation and creates somewhat of a seal. If you used a liquid foundation alone, you can usually feel a “damp” feeling on your face. You can combat this by using a loose setting powder. It can also help remove excess shine.
It’s really beneficial for us oily girls to use a setting powder so that the oils in our skin don’t break down our makeup to the point where it’s sliding and/or disappearing from our faces thus making touch-ups less frequent. It also can stop our makeup from getting all over our clothing or anything we touch throughout the day.
Translucent/Loose Powders~ provides a natural, virtually undetectable finish. In fact, you'll hardly know it's there. The fine-textured formula takes down shine without dulling and won't streak, cake or clog pores.Translucent/loose powders can be purchased in a color close to you skin tone or a white/off white color.
Pressed Powders~ also known as blotting powders provides a small amount of coverage. This powder usually comes in a compact and can be used throughout the day to control oil and shine. Pressed powder can also be used without foundation for minimal coverage. Pressed powder are usual purchased in a color close to your skin tone.
*A little goes a long way. If your face has a "casper the friendly ghost" look or your makeup starts to look cakey or you can flat out see the powder... you probably applied too much.
FINISHING SPRAY
Finishing sprays are usually applied by a spritzer on the face for a little 'pick-me-up'. If you had a long day at work and don't have time to reapply for your after work festivities, a finishing spray works great. They are also perfect for the dewy look we all love. The spray is meant to resist the heat and humidity which causes smearing, melting and loss of makeup color. It is often used by make-up artists on models and actors for photo shoots and filming.
[I am not a reapply/touch-up girl, I don't even carry a makeup bag throughout the day. After applying my foundation in the morning I set it with MAC's Mineralized Skinfinish Natural, if I get oily I blot off excess oil with
Thursday, March 31, 2011
Makeup for Absolute Beginners | The Brows
Be sure to read Let's Talk Brows! first.

Brush your brows 'up and out' with a brow brush or mascara wand.

Start to define your brow with a brown pencil or powder slightly lighter than your hair color. I used MAC's Spiked.

Follow your natural arch.

Use light stokes in the direction of your natural brow to fill in the rest.

Continue to fill-in to your liking.

*Optional~ to further define your brows take a concealer (your shade or a shade lighter) {I used the same concealer that I can use on the rest of my face} and apply is as if you are applying a brow bone highlight. This will give you brow and extra "oomph".
Thursday, March 24, 2011
Makeup for Absolute Beginners | Foundations: Coverage, Finish + Shades and Undertones
[my work]
Foundation can do fabulous things to the skin. It can make your skin appear dewy, make your oily skin matte, cover blemishes, etc. In addition to finding the right foundation for your skin type, coverage and finish are factors to consider also.
Coverage~ how much of your natural skin will show through.
Sheer coverage- gives luminosity to the skin.
Medium coverage-natural but can cover blemishes or redness.
Full coverage- will completely cover anything you would like to conceal.
Finish~ texture the foundation leaves on your skin.
Satin- dewy, luminous
Natural- perfect balance between satin and matte. Perfect for everyday.
Matte- oil controlled. No shine at all.
Shade and Undertones
This is where it can get real tricky. We've all picked up foundation that we thought were sure to be a perfect match on to find out it was all wrong. Choosing the correct shade and matching your undertones is imperative to the perfect foundation.
Undertones refer to the tones underneath your skin. Most people are yellow/golden, olive or pink/red. This is why some cosmetic companies use labels like warm/neutral/cool.
Yellow/Golden = Warm
Olive = Neutral
Pink/Red = Cool
[Note: MAC's Neutral Cool (NC) vs Neutral Warm (NW) foundations work a little different. For example, I have warm undertones but MAC's NC shades work best for my complexion because the cool from the NC shades neutralizes my warm undertones making the foundation appear more natural on me. Depending on your shade {see below} this theory may not work for you. I can only use this reverse theory with MAC. With other foundations like Loreal True Match, I have to stick to their warm shades. Get it? Confusing.. I know.]
Some easy ways to determine your undertone is to (1) stand in natural light with a bare face and see which color(s) shine through your skin most or (2) look at the veins in your arm; if they appear green then your are more than likely warm, if they appear blue you are more than likely cool.
Shade refers to how light or dark your skin is. You should your match foundation on high plains of cheek to neck. A lot of us run into the issue where we may have two or three different shades on our face. You may have to use a lighter shade in the center of your face and a darker shade on the outer areas to avoid looking 'washed out'.
** I feel like this may be a little (a lot) confusing but I explained it the best I could. Remember 'if it aint broke don't fix it' and 'keep it simple'. I will try my best to answer any questions you may have.
Thursday, March 10, 2011
Makeup for Absolute Beginners | Repost: Choosing The Right Foundation For Your Skin Type
I decided to repost this post because I felt it really explains what foundation is best for different skin types. I added some foundations options for each skin type to assist you find your holy grail foundation.
We all know what a headache finding the right foundation can be. Choosing the wrong foundations can lead to break outs, ashy skin, two-toned skin... just a plethora of problems. Half the battle of choosing the right foundation is choosing the foundation that right for your skin type. We all know that foundations must match your tone, the perfect amount of coverage is important but the foundation should also be work well with your skin type to ensure a flawless finish.
Oily Skin~ Oily skin is caused by over-active glands, which produce a substance called Asebum, a naturally healthy skin lubricant. When the skin produces too much sebum, it becomes thick and heavy in texture. It is prone to blackheads. The oil oozes and gives the skin a greasy shine. The pores are enlarged and the skin has a coarse look.
- Pressed Powder Foundation: Pressed powder controls shine while leaving the skin with a matte finish.
- Oil-Free Liquid Foundation: An oil free liquid foundation is great for oily skin. It can also give you a dewy look while controlling oil.
- Mineral Makeup: Offers light-medium coverage while absorbing excess oil and hydrating the skin.
- Cream Foundation: Cream foundation's are great for drier skin-types because they tend to be more moisturizing and lends a dewy finish to the skin.
- Tinted Moisturizer: Tinted moisturizers offers a slight hint of color while hydrating the skin. This is perfect for achieving that "fresh faced, no-makeup" look.
- Tinted Moisturizer: Tinted moisturizers offers a slight hint of color while hydrating the skin.
- Mineral Foundation: Offers light-medium coverage while absorbing excess oil and hydrating the skin.
- Liquid Foundation: Offers light-medium coverage in a variety of finishes while evening out skin tone and hydrating the skin.
- Cream Foundation: Ideal for those uneven skin tones or if you're looking for heavier coverage.
- Cream-Powder Foundation: Best suited for heavy coverage, cream to powder foundation controls shine in the T-zone and leaves your skin fresh and flawless.
- Liquid-Powder Foundation: This type of makeup is ideal for those looking for light-medium coverage.
- If you have sensitive/acne prone skin, it's best to reach for foundations with moisturizing ingredients, oil-free, paraben and fragrance free, as well as allergy tested.
- Visit a dermatologist to find a path for healthier skin.
Wednesday, February 16, 2011
Revive Your Makeup With a Few Simple Steps
I'm going to be honest with y'all, I usually do not touch-up my makeup throughout the day nor do I carry a makeup bag. However, there are times when we have an after-five event to attend leaving us very little time to freshen up in between. Below are a couple of steps to take you from looking like you've been in and out of meetings all day to fresh out of a MUA's chair.
Remove shine: Use blotting paper (or if you're like me a paper towel) to remove any oil that may have found a home on your skin throughout out the day.
Eyeliner check: Remove any smeared eyeliner or mascara from the eye area with a cotton swab and a little moisturizer. Dip a cotton swab in a dollop of moisturizer and gently remove any liner or mascara with your swab. Using the moisturizer helps remove the product without breaking down the foundation/concealer underneath it.
Creased eyeshadow?: If your eyeshadow has creased, blot eyes with a clean sponge (or if your like me a paper towel) removing any oil from the lid. Reapply a small amount of shadow to the eyes and be sure to blend.
Remove shine: Use blotting paper (
Eyeliner check: Remove any smeared eyeliner or mascara from the eye area with a cotton swab and a little moisturizer. Dip a cotton swab in a dollop of moisturizer and gently remove any liner or mascara with your swab. Using the moisturizer helps remove the product without breaking down the foundation/concealer underneath it.
Creased eyeshadow?: If your eyeshadow has creased, blot eyes with a clean sponge (
Reapply Powder: Reapply pressed or translucent powder as needed to mattify oil prone areas of your skin. You can also lightly touch-up your blush but only if needed.
Revive those lips: Revive your lip color by simply adding a bit of gloss or completely remove your lipstick/gloss, moisturize your lips, then reapply your lip liner, lipstick and/or lip gloss. I'd go for the latter.
Finishing Spray: Lightly spray your face with your favorite finishing spray for a natural glow.
Cheers!
[photo source]
Cheers!
[photo source]
Thursday, December 23, 2010
Choosing The Right Foundation For Your Skin Type
We all know what a headache finding the right foundation can be. Choosing the wrong foundations can lead to break outs, ashy skin, two-toned skin... just a plethora of problems. Half the battle of choosing the right foundation is choosing the foundation that right for your skin type. We all know that foundations must match your tone, the perfect amount of coverage is important but the foundation should also be work well with your skin type to ensure a flawless finish.
Oily Skin~ Oily skin is caused by over-active glands, which produce a substance called Asebum, a naturally healthy skin lubricant. When the skin produces too much sebum, it becomes thick and heavy in texture. It is prone to blackheads. The oil oozes and gives the skin a greasy shine. The pores are enlarged and the skin has a coarse look.
- Pressed Powder Foundation: Pressed powder controls shine while leaving the skin with a matte finish.
- Oil-Free Liquid Foundation: An oil free liquid foundation is great for oily skin. It can also give you a dewy look while controlling oil.
- Mineral Makeup: Offers light-medium coverage while absorbing excess oil and hydrating the skin.
- Cream Foundation: Cream foundation's are grerat for drier skin-types because they tend to be more moisturizing and lends a dewy finish to the skin.
- Tinted Moisturizer: Tinted moisturizers offers a slight hint of color while hydrating the skin. This is perfect for achieving that "fresh faced, no-makeup" look.
- Tinted Moisturizer: Tinted moisturizers offers a slight hint of color while hydrating the skin.
- Mineral Foundation: Offers light-medium coverage while absorbing excess oil and hydrating the skin.
- Liquid Foundation: Offers light-medium coverage in a variety of finishes while evening out skin tone and hydrating the skin.
- Cream Foundation: Ideal for those uneven skin tones or if you're looking for heavier coverage.
- Cream-Powder Foundation: Best suited for heavy coverage, cream to powder foundation controls shine in the T-zone and leaves your skin fresh and flawless.
- Liquid-Powder Foundation: This type of makeup is ideal for those looking for light-medium coverage.
- If you have sensitive/acne prone skin, it's best to reach for foundations with moisturizing ingredients, oil-free, paraben and fragrance free, as well as allergy tested.
- Visit a dermatologist to find a path for healthier skin.
Wednesday, December 15, 2010
Faces by Tamara 2010 Beauty Wrap-Up
As a makeup artist and a beauty enthusiast I come across tons of products but there are only a few that I can not do without. Since this is my first time doing a "beauty wrap up" I decided to give you the nitty gritty {what will ALWAYS be on my list} of must-haves. So without further ado... adieu? Whatever, here goes!
*Click on each product for purchasing information.
My Clarisonic. I love my clarisonic. I use it about three times a week and it leaves my face feeling clean and supply. My enlarged pores seem to be smaller and my skin is much softer. I use it with Cetaphil Gentle Skin Cleanser and moisturize with Aveeno Positively Radiant Moisturizer.
NARS Blushes. While many women skip blush {talked about that here} its a very important step in my routine. It highlights my cheekbones creating more dimension on my face. NARS blushes are pigmented and very vibrant and with a hefty price tag of $26 you are guaranteed to get your monies worth because a little goes a long way. My favorites are Orgasm, Taj Mahal and Exhibit A.
MAC Spiked Brow Pencil. Before I switched to Spiked brow pencil I was using a powder. In my opinion, the pencil gives me a softer more natural brow.
*Click on each product for purchasing information.
My Work
NARS Blushes. While many women skip blush {talked about that here} its a very important step in my routine. It highlights my cheekbones creating more dimension on my face. NARS blushes are pigmented and very vibrant and with a hefty price tag of $26 you are guaranteed to get your monies worth because a little goes a long way. My favorites are Orgasm, Taj Mahal and Exhibit A.
MAC Spiked Brow Pencil. Before I switched to Spiked brow pencil I was using a powder. In my opinion, the pencil gives me a softer more natural brow.
Yves Saint Laurent Touche Éclat. I have yet to purchase this for myself, every time I go to Sephora the $40 price tag always gets me but this instant pick-me-up brings light and radiance to the skin. It brightens the complexion to perfection and will be one of the first products I add to my collection in 2011.
NYX Jumbo Pencil. These are a great, inexpensive alternative to paints and paint pots. They help eye shadows that wouldn't normally show well on our skin to pop. For less than $5 a pop, you can't go wrong. You may still need to use a base like Urban Decay's Primer Potion underneath these because they can crease.
Benefit BAD gal Mascara. I love love love this mascara. It lengthens, separates and add tons of volume to my lashes. I don't have long, full lashes so mascara has always been a struggle for me but the BAD gal wand goes a great job at intensifying my eyes.
MAC Eyeshadows. Always a favorite of mine. MAC has just about every color you can dream of and for the most part the shadows are pigmented, intense and they last. The range in textures and colors gives you a lot to choose from and will have you grinning from ear-to-ear every time you step foot near a MAC counter.
MAC Lipsticks. Matte, Amplified, Lustre, Glaze.... I love their lipsticks. Their range of color is massive and its the home of my favorite color, Ruby Woo!
What were some of your favorite products this year?
Subscribe to:
Posts (Atom)